Selasa, 3 April 2012
Examinations of Patient
Isnin, 30 Januari 2012
Sports Injury Cycle
1. Preventing:
To stop an injury from occurring.
2. Incident Phase:
The first few seconds to minutes around that injury. DRABS implemented to ensure there is no danger or life threatening problems.
3. Acute Phase:
48 – 72 hours after the injury. Injury is quickly assess using STOP, TOTAPS, RICER, etc to provide appropriate initial management and to ensure there is no further damage to the injured part. This step also provides appropriate instructions to the athlete regarding their responsibilities over the next 48 – 72 hours.
4. Definitive Care:
When athlete is referred to a health professional for a definitive diagnosis. Sport trainers work with the health professional to plan management through to athletes return to sport.
5. Rehabilitation:
6. Prevention of Reoccurrence:
[Sekolah Sukan’s School Diary SPeED (Student Personal Educational Diary)]
Jumaat, 23 Julai 2010
Poisoning
For an inhaled poison, get victim to fresh air immediately. Call 991. Maintain airway and breathing. Keep victim warm and quiet. Save the container to give to the paramedics.
How to prevent poisoning?
- Store ALL medications in a locked cabinet, far from kid’s reach.
- Never leave cosmetics and toiletries within easy reach of children.
- Make sure purses and bags that could contain poisonous items such as medications are kept out of reach of kids at all times.
- Always keep pills and liquids in their original containers.
- Never put cleaning products in old beverage bottles or containers that were once used for food.
Isnin, 28 Jun 2010
Fractures, Sprains, Dislocations
DO NOT MOVE victim if you suspect neck or spine trauma unless he is in immediate danger. Hold hands on each of head and do not let go until medical help arrives.
Upper extremity injuries: Control bleeding, if any. Splint arm in position found using available materials. Use a sling and cravats (long, skinny ties) to limit motion. Seek medical attention. Ice may slow bleeding and swelling.
Lower extremity injuries: These can cause serious internal bleeding and there can be external bleeding, too. Call for medical help.
Control bleeding, and reat for shock. Splint the limb with available materials without moving limb. Do no allow victim to bear weight on limb, as there may be a fracture.
Jumaat, 25 Jun 2010
Nosebleeds
Your aims:
- To control blood loss.
- To maintain an open airway.
Treatment:
- Ask the casualty to sit down.
- Advise them to tilt their head forwards to allow the blood to drain from the nostril.Ask the casualty to breath through their mouth (this will also have a calming effect) and to pinch the soft part of the nose.
- Reassure and help if necessary.
- Tell the casualty to keep pinching their nose.
- Advice them not to speak, swallow, cough, spit or sniff because this may disturb blood clots that may have formed in the nose.
- After 10 minutes, tell the casualty to release the pressure. If the bleeding has not stopped, tell them to reapply the pressure for two further periods of 10 minutes.
- Once the bleeding has stopped and with the casualty still leaning forwards, clean around their nose with lukewarm water.
- Advise the casualty to rest quietly for a few hours. Tell them to avoid exertion and in particular, not to blow their nose, because these actions will disturb any clots.
Caution!
- Do not let the head tip back; blood may run down the throat inducing vomiting.
- If bleeding stops and then restarts, tell the casualty to reapply pressure.
- If the nosebleed is severe, or if it lasts longer than 30 minutes in total, take or send the casualty to hospital in the treatment position.
Khamis, 27 Mei 2010
Shock
Jumaat, 21 Mei 2010
Bleeding
Put on latex gloves. Do the following in this order:
- Put pressure on the wound with cleanest material available (sterile gauze pads are best).
- If bleeding slows down but does not stop, apply more dressings on top.
- If bleeding still does not stop, elevate the limb.
- If bleeding still does not stop, apply a pressure dressing, tying the dressing down tightly but not enough to cut off the circulation. Keep the limb elevated.
- If bleeding still does not stop, put pressure on the brachial artery in the upper arm or the femoral artery in the groin. NEVER APPLY A TOURNIQUET.
If the wound is minor, after the bleeding has stopped, wash the area and apply an adhesive bandage or sterile dressing. Try not to touch any wound directly to avoid infection.
Ahad, 9 Mei 2010
Position of Victim

Selasa, 23 Februari 2010
Relief of Choking in Children
Signs of Choking
Choking occurs when something blocks the airway. When the airway is completely blocked, the child cannot breathe. Choking can be a frightening emergency. But if you act quickly, you can help the child breathe.
If the child can speak or cough loudly, the child’s airway is only partly blocked. You should not try to open the airway. If you are worried about the child’s breathing, call 991 or your local emergency number.
Signs of choking in the child with a completely blocked airway are:
- The child suddenly begins to cough, gag or have high-pitched, noisy breathing
- An older child may make the choking sign (holding the neck with one or both hands)
- The child has bluish lips or skin
Actions to Relieve Choking in a Child
When a child is choking and can’t breathe or speak, you must give abdominal thrusts (the Heimlich maneuver). The Heimlich maneuver pushes air from the child’s lungs like a cough. This can help remove the blocking object. You should give abdominal thrusts until the object is forced out or the victim becomes unresponsive.
1. If you think a child is choking, ask the child, “Are you choking?” If the child nods, ask, “Can you speak?” If the child can’t speak, cough loudly or cry, tell the child that you are going to help. Stand firmly behind the child and wrap your arms around him or her that your fists are in front of the child.
2. Make a fist with one hand.
3. Put the thumb side of the fist on the child’s abdomen, slightly above the navel and well below the breastbone.
4. Grasp the fist with your other hand and give quick upward thrusts into the child’s abdomen.
5. Give thrust until the object is forced out or the child becomes unresponsive.
If the choking is not relieved, the child will become unresponsive. When the child becomes unresponsive, shout for help, lower the child to the ground and start CPR. If someone else is present, send that person to call 991 (or your local emergency number) for an ambulance while you start CPR.
The steps of CPR of the child who has become unresponsive after choking are the same, with one addition:
1. Check for response. If unresponsive, send someone to call 991 while you start CPR.
2. Open the airway, check breathing. If there is no normal breathing, give two rescue breaths that make the chest rise. Every time you open the airway to give rescue breaths, open the mouth wide and look for the object. If you see an object in the throat, remove it. Do not spend a lot of time looking and do not perform blind finger sweeps. If you do not see an object, continue CPR.
3. Check for sign of circulation. If there are no signs of circulation, start chest compressions. Give cycles of five compressions and one rescue breath for one minute and then call 991. Give CPR as needed until the child responds or EMS rescuers arrive.
Chest compressions may force the object out. If you are alone with the child and these steps don’t work after about one minute, call 991.
Khamis, 31 Disember 2009
CPR Can make You a Lifesaver
Time Required : CPR should start as soon as possible! You can save lives within 10 minutes.
There is no substitute for learning Cardiopulmonary resuscitation (CPR). CPR is a skill we’ll never be called upon to use, but it may be the most valuable skill anyone could have.
Here’s How:
1. Stay safe! The worst thing a rescuer can do is become another victim. Follow universal precautions and wear personal protective equipment if you have it. Use common sense and stay away from potential hazards.
2. Attempt to wake victim. Briskly rub your knuckles against victim’s sternum. If the victim does not wake, call 991 and proceed to step 3. If the victim does not wake, moans, or moves, then CPR is not necessary at this time. Call 991 if the victim is confused or not able to speak.
3. Begin rescue breathing. Open the victim’s airway using the head-tilt, chin-lift method.
4. Put your ear to the victim’s open mouth:
- look for chest movement
- listen for air flowing through the mouth or nose
- feel for air on your cheek
If there is no breathing, pinch the victim’s nose; make a seal over the victim’s mouth with yours. Use a CPR mask if available. Give the victim a breath big enough to make the chest rise. Let the chest fall then repeat the rescue breath once more.
5. Begin chest compressions. Place the heel of your hand in the middle of the victim’s chest. Put your other hand on top of the first with your fingers interlaced. Compress the chest about 4 – 5 cm. Allow the chest to completely recoil before the next compression.
6. Repeat rescue breaths. Open the airway with head-tilt, chin-lift again. This time, go
7. Perform 30 more chest compressions. Repeat steps 5 and 6 for about two minutes.
8. Stops compressions and recheck victim for breathing. If the victim is not breathing, continue chest compressions and rescue breaths.
9. Keep going until help arrives.
Tips:
1. If you have access to an automated external defibrillator, attach it to the victim after approximately one minute of CPR (chest compressions and rescue breaths).
2. Chest compressions are extremely important and help maintain some blood flow to the lungs, brain, coronary arteries, and other major organs. If you are not comfortable giving rescue breaths, continue to perform chest compressions!
3. It’s normal to feel pops and snaps when you first begin chest compressions – DON’T STOP! You aren’t going to make the victim any worse. Cardiac arrest is as bad as it gets.
4. When performing chest compressions, do not let your hands bounce. Let the chest fully recoil, but keep the heel of your hand in contact with the sternum at all times.
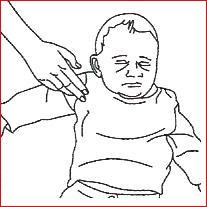
1. Shout and Tap: shout and gently tap the child on the shoulder
2. Open The Airway: Open the airway using a head tilt lifting of chin. Do not tilt the head too far back.
3. Give 2 Gentle Breaths: If the baby is NOT breathing, give 2 small gentle breaths. Cover the baby’s mouth and nose with your mouth. Each breath should be 1 second long. You should see the baby’s chest rise with each breath.
4. Give 30 Compressions: Give 30 gentle chest compressions at the rate of 100 per minute. Use two or three fingers in the center of the chest just below the nipples. Press down approximately one-third the depth of the chest.
5. Repeat: Repeat with 2 breath and 30 compressions. After two minutes of repeated cycles call 991 (or your local emergency number) and continue giving breaths and compressions.
Warning: Do not attempt to do the CPR if you are not well-trained. Check your local CPR practitioner to know further.
Jumaat, 11 Disember 2009
FIRST AID
Are you trained in first aid?
Basic first aid, for example how to stop bleeding by applying pressure, can be crucial, even life saving knowledge. First-aid courses are often offered by BRCS, local hospitals and charitable hospital for nominal charges. Think how happy you (and the victim) will be if you are able to make use of current training in an emergency situation.
Your Duties as a First Aider
Anyone performing first aid has some responsibilities:
Being a first aider
First aid is based on knowledge, training and expertise. A first aider will have completed a practical training course under the supervision of a recognized first aid organization. If you’re present at the scene of an accident or during a medical emergency, you need to go through the following stages:
- Assess the situation.
- Take control of your feeling, don’t act impulsively.
- Look for continuing danger, to the casualties and to yourself.
- Decide whether to call for emergency help.
Assess the casualties
A quiet casualty may be an indication that the person is unconscious. Quiet casualties should always be your first priority.
- Prioritize treatment of casualties according to severity of injury.
- Check response by asking casualties whether they are all right.
- Check breathing.
- If a casualty isn’t breathing, ask somebody to call 991 immediately and give 30 chest compressions followed by two rescue breaths.
- Continue this sequence until emergency help arrives or the casualty starts to show some response.
Further assistance to casualties
- Aim to give all casualties early and effective help.
- Arrange for casualties to be taken to hospital where necessary.
- Remain with casualty until help arrives.
- Prevent cross-infection between yourself and the casualty.
- Take care of casualty’s possessions and ensure they accompany the casualty to hospital.
Protection against cross-infection
The risks from HIV or hepatitis B are small and can be minimised:
- Wash your hand.
- Wear plastic gloves and an apron where possible.
- Cover any wounds on your own skin with plasters.
- Be careful where there are needles present.
If, after an incident, you have any fears about the infection, contact your doctor.
First Aid Kits
A well-stocked first aid kit, kept within easy reach, is a necessary in every home. Having supplies gathered ahead of time will help you handle an emergency at a moment’s notice. You should keep one first-aid kit in your home and one in your car. Also be sure to bring a first-aid kit on family vacations.

Choose containers for your kits that are roomy, durable, easy to carry, and simple to open. Plastic tackle boxes or containers for storing art supplies are ideal, since they’re lightweight, have handles, and offer a lot of space.
BRCS doesn’t sell the first-aid kits (until further notice) but you can buy all items for your first aid kits at a well-stocked drug store. Ask the pharmacist for help in selecting items. Include the following in each of your first-aid kits:
- first-aid manual
- sterile gauze
- adhesive tape
- adhesive bandages in several sizes
- elastic bandage
- antiseptic wipes
- soap
- antibiotic cream (triple-antibiotic ointment)
- antiseptic solution (like hydrogen peroxide)
- hydrocortisone cream (1%)
- paracetamol (panadol)
- extra prescription medications (if the family in going on vacation)
- tweezers
- sharp scissors
- safety pins
- disposable instant cold packs
- calamine lotion
- thermometer
- plastic gloves (at least 2 pairs)
- mouthpiece for administering CPR
- your list of emergency phone numbers
- blanket (stored nearby)
After you’ve stocked your first-aid kit:
Read the entire first-aid manual so you’ll understand how to use the contents of your kits. (If your children are old enough to understand, review the manuals with them as well.)
Store first-aid kits in places that are out of children’s reach but easily accessible for adults. Check the kits regularly. Replace missing items or medicines that may have expired.