PBSM NBD Slideshow

Khamis, 31 Disember 2009

CPR Can make You a Lifesaver

Difficulty : Easy
Time Required : CPR should start as soon as possible! You can save lives within 10 minutes.

There is no substitute for learning Cardiopulmonary resuscitation (CPR). CPR is a skill we’ll never be called upon to use, but it may be the most valuable skill anyone could have.

Here’s How:
1. Stay safe! The worst thing a rescuer can do is become another victim. Follow universal precautions and wear personal protective equipment if you have it. Use common sense and stay away from potential hazards.
2. Attempt to wake victim. Briskly rub your knuckles against victim’s sternum. If the victim does not wake, call 991 and proceed to step 3. If the victim does not wake, moans, or moves, then CPR is not necessary at this time. Call 991 if the victim is confused or not able to speak.
3. Begin rescue breathing. Open the victim’s airway using the head-tilt, chin-lift method.
4. Put your ear to the victim’s open mouth:
- look for chest movement
- listen for air flowing through the mouth or nose
- feel for air on your cheek
If there is no breathing, pinch the victim’s nose; make a seal over the victim’s mouth with yours. Use a CPR mask if available. Give the victim a breath big enough to make the chest rise. Let the chest fall then repeat the rescue breath once more.
5. Begin chest compressions. Place the heel of your hand in the middle of the victim’s chest. Put your other hand on top of the first with your fingers interlaced. Compress the chest about 4 – 5 cm. Allow the chest to completely recoil before the next compression.
Compress the chest at a rate equal to 100/minute. Perform 30 compressions at this rate.
6. Repeat rescue breaths. Open the airway with head-tilt, chin-lift again. This time, go
directly to rescue breath, making sure the chest rises and falls, then give another.
7. Perform 30 more chest compressions. Repeat steps 5 and 6 for about two minutes.
8. Stops compressions and recheck victim for breathing. If the victim is not breathing, continue chest compressions and rescue breaths.
9. Keep going until help arrives.


Tips:
1. If you have access to an automated external defibrillator, attach it to the victim after approximately one minute of CPR (chest compressions and rescue breaths).
2. Chest compressions are extremely important and help maintain some blood flow to the lungs, brain, coronary arteries, and other major organs. If you are not comfortable giving rescue breaths, continue to perform chest compressions!
3. It’s normal to feel pops and snaps when you first begin chest compressions – DON’T STOP! You aren’t going to make the victim any worse. Cardiac arrest is as bad as it gets.
4. When performing chest compressions, do not let your hands bounce. Let the chest fully recoil, but keep the heel of your hand in contact with the sternum at all times.

CPR for Infants

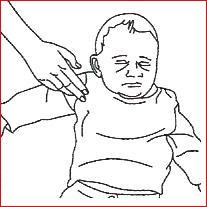
1. Shout and Tap: shout and gently tap the child on the shoulder


2. Open The Airway: Open the airway using a head tilt lifting of chin. Do not tilt the head too far back.


3. Give 2 Gentle Breaths: If the baby is NOT breathing, give 2 small gentle breaths. Cover the baby’s mouth and nose with your mouth. Each breath should be 1 second long. You should see the baby’s chest rise with each breath.


4. Give 30 Compressions: Give 30 gentle chest compressions at the rate of 100 per minute. Use two or three fingers in the center of the chest just below the nipples. Press down approximately one-third the depth of the chest.


5. Repeat: Repeat with 2 breath and 30 compressions. After two minutes of repeated cycles call 991 (or your local emergency number) and continue giving breaths and compressions.

Warning: Do not attempt to do the CPR if you are not well-trained. Check your local CPR practitioner to know further.

Isnin, 21 Disember 2009

Peralatan Pertolongan Cemas

Peralatan pertolongan cemas pada asalnya sangat ringkas iaitu hanya terdiri dari bebat dan pembalut selain dari menggunakan air namun perkembangan dunia perubatan di dalam peralatan semakin berkembang maka peralatan pertolongan cemas turut berkembang mengikut zaman. Bahkan sesetengah peti pertolongan cemas juga mengandungi peralatan rawatan yang sama seperti yang dimiliki oleh doktor-doktor perubatan yang melawat ke kampung-kampung di pendalaman.


Peralatan di dalam peti pertolongan cemas adalah bergantung kepada kegunaan di dalam berbagai keadaan seperti:

- di dalam perjalanan percutian, pengembaraan atau perlancongan
- di rumah
- di sekolah
- di dalam kereta
- di dalam perkhemahan

Berikut dihuraikan terlebih dahulu peralatan pertolongan cemas yang asas iaitu bebat dan pembalut.


Bebat & Pembalut

Bebat ada 3 jenis iaitu:

1. Bebat Medan – bagi kegunaan pasukan keselamatan
2. Bebat Luka – mengikut ukuran-ukuran luka
3. Bebat Hospital – jenis kain kasa berukuran 10 x 10 mm

Pembalut ada 2 jenis iaitu:

1. Pembalut Kain Tiga Segi – bagi menganduh, membalut, mengampu, kipas, pengikat

dan gelung cincin
2. Pembalut bergulung – bagi melakukan Balutan Lapan, Balutan Circular atau Spiral

dan Balutan Padi


Alat Pertolongan Cemas yang lain

Alat pertolongan cemas yang akan disenaraikan di bawah ini adalah bagi kegunaan orang awam. Di antaranya ialah:

- angkub (tweezers)
- plaster
- krim luka antiseptik (spt. Dettol Antiseptic Cream, dll)
- gunting lipat
- pin semat
- thermometer
- pita perekat
- sabun antiseptik
- sarung tangan getah (sekurang-kurangnya 2 pasang)
- paracetamol (spt. Panadol, dll)
- buku manual pertolongan cemas
- nombor talian kecemasan
- minyak sapu (spt. Vicks VapoRub, Minyak Cap Kapak, dll)
- tisu basah antiseptik pakai-buang


Kaedah Ikatan

Ada 2 kaedah yang digunakan:

1. Buku Sila (Reff Knot)
2. Kuku Kambing


Luka

Luka ada 2 jenis:

1. Luka tertutup seperti lebam
2. Luka terbuka iaitu luka yang dapat dilihat


Jumaat, 11 Disember 2009

FIRST AID

About First Aid
Are you trained in first aid?
Basic first aid, for example how to stop bleeding by applying pressure, can be crucial, even life saving knowledge. First-aid courses are often offered by BRCS, local hospitals and charitable hospital for nominal charges. Think how happy you (and the victim) will be if you are able to make use of current training in an emergency situation.

Your Duties as a First Aider
Anyone performing first aid has some responsibilities:

Being a first aider
First aid is based on knowledge, training and expertise. A first aider will have completed a practical training course under the supervision of a recognized first aid organization. If you’re present at the scene of an accident or during a medical emergency, you need to go through the following stages:

- Assess the situation.
- Take control of your feeling, don’t act impulsively.
- Look for continuing danger, to the casualties and to yourself.
- Decide whether to call for emergency help.

Assess the casualties
A quiet casualty may be an indication that the person is unconscious. Quiet casualties should always be your first priority.
- Prioritize treatment of casualties according to severity of injury.
- Check response by asking casualties whether they are all right.
- Check breathing.
- If a casualty isn’t breathing, ask somebody to call 991 immediately and give 30 chest compressions followed by two rescue breaths.
- Continue this sequence until emergency help arrives or the casualty starts to show some response.


Further assistance to casualties
- Aim to give all casualties early and effective help.
- Arrange for casualties to be taken to hospital where necessary.
- Remain with casualty until help arrives.
- Prevent cross-infection between yourself and the casualty.
- Take care of casualty’s possessions and ensure they accompany the casualty to hospital.

Protection against cross-infection
The risks from HIV or hepatitis B are small and can be minimised:
- Wash your hand.
- Wear plastic gloves and an apron where possible.
- Cover any wounds on your own skin with plasters.
- Be careful where there are needles present.
If, after an incident, you have any fears about the infection, contact your doctor.


First Aid Kits
A well-stocked first aid kit, kept within easy reach, is a necessary in every home. Having supplies gathered ahead of time will help you handle an emergency at a moment’s notice. You should keep one first-aid kit in your home and one in your car. Also be sure to bring a first-aid kit on family vacations.


Choose containers for your kits that are roomy, durable, easy to carry, and simple to open. Plastic tackle boxes or containers for storing art supplies are ideal, since they’re lightweight, have handles, and offer a lot of space.

BRCS doesn’t sell the first-aid kits (until further notice) but you can buy all items for your first aid kits at a well-stocked drug store. Ask the pharmacist for help in selecting items. Include the following in each of your first-aid kits:

- first-aid manual
- sterile gauze
- adhesive tape
- adhesive bandages in several sizes
- elastic bandage
- antiseptic wipes
- soap
- antibiotic cream (triple-antibiotic ointment)
- antiseptic solution (like hydrogen peroxide)
- hydrocortisone cream (1%)
- paracetamol (panadol)
- extra prescription medications (if the family in going on vacation)
- tweezers
- sharp scissors
- safety pins
- disposable instant cold packs
- calamine lotion
- thermometer
- plastic gloves (at least 2 pairs)
- mouthpiece for administering CPR
- your list of emergency phone numbers
- blanket (stored nearby)


After you’ve stocked your first-aid kit:
Read the entire first-aid manual so you’ll understand how to use the contents of your kits. (If your children are old enough to understand, review the manuals with them as well.)

Store first-aid kits in places that are out of children’s reach but easily accessible for adults. Check the kits regularly. Replace missing items or medicines that may have expired.


PERTOLONGAN CEMAS

Pengenalan

Pertolongan cemas ialah pertolongan pertama yang diberikan kepada pesakit secara tiba-tiba sebelum dihantar ke rumah sakit atau berjumpa doktor.

Tujuannya adalah:

Ÿ Menyelamatkan nyawa
Ÿ Mengelakkannya dari menjadi bertambah buruk
Ÿ Mempercepatkan kadar penyembuhan


Ahli Pertolongan Cemas (APC)

Ahli pertolongan cemas (APC) ialah seseorang yang telah terlatih dan mempunyai sijil kelayakan yang diiktiraf dalam kerja-kerja pertolongan cemas.

APC bertanggungjawab ke atas pesakit dari masa menemui pesakit sehingga ianya diserahkan kepada pihak rumah sakit. Jangan meninggalkan pesakit seorang diri terutamanya pesakit yang pengsan. Buat catatan laporan mengenai pesakit dan serahkan laporan kepada doktor yang merawat pesakit itu.

Seorang APC yang bijaksana memiliki kriteria:

Ÿ Teliti
Ÿ Bijak
Ÿ Berikhtiar
Ÿ Cekap
Ÿ Jelas
Ÿ Tahu menilai
Ÿ Terus berusaha
Ÿ Bersimpati

Seorang APC juga hendaklah sentiasa bersiap sedia pada setiap masa bagi menghadapi sebarang kemungkinan. Dia hendaklah melakukan pertolongan cemas yang sesuai dengan keadaan yang berbeza-beza.

Keadaan yang berbeza-beza itu ialah:

1. bertindak serta merta
2. tentukan siapa yang patut diutamakan
3. pindahkan ke tempat perlindungan
4. berikan perlindungan gantian jika tidak dapat dipindahkan
5. mendapat cahaya yang cukup
6. undurkan orang ramai yang mengerumuni

Dasar-dasar Pertolongan Cemas

Sebelum melakukan pertolongan cemas, seseorang APC terlebih dahulu akan meneliti perkara berikut:

D - Danger (Bahaya)
R - Respond (Tindakbalas)
A - Airway (Saluran pernafasan)
B - Breathing (Pernafasan)
C - Circulation (Peredaran darah)

Dalam pada itu terdapat 4 faktor utama di dalam bidang pertolongan cemas yang perlu diberi perhatian iaitu:

1. menghadapi keadaan
2. menentukan apa yang salah pada si mangsa
3. memberi rawatan dengan segera
4. mengatur bagaimana mengendalikan mangsa sehingga mangsa segera mendapat rawatan di hospital